


Tools’ Orderliness is paramount in machining as it helps retain efficiency and guarantees that good quality work is inescapably produced. End mills are among the most versatile and accurate cutting tools; therefore, appropriate end mill holders must be used to observe the cutting edges and extend the service life. In the most bulging years of tool storage systems, this ultimate guide will cover the best end mill storage ideas, covering many available systems and methods of organizing tools. From conventional options, such as wooden racks and drawers, to modern ones, like magnetic holders and foam inserts, this article will help the reader understand how to make the most of the working area. By employing these methods, you can optimize your workshop by restructuring operations, enhancing the retrieval of tools, and increasing productivity.
How to Effectively End Mill Storage?

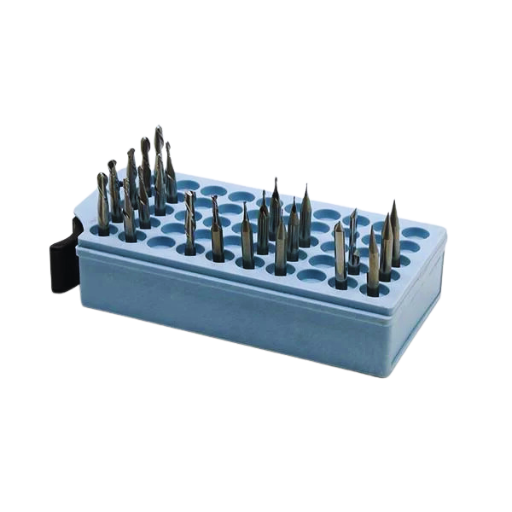
Types of End Mill Storage Solutions
It is important to define how the end mills will be boxed, how they will be protected from damage, how they will be retrieved, and how they will be efficiently warehoused. At this point, some good examples of storage solutions for storing end mills are as follows:
- Wood Trolley: This is an old-style reliable means of bulk train storage of end mills. The mills are kept upright by being placed in the rack, which prevents the cutting edges from wearing while providing visibility.
- Foam Inserts: End mills can be secured in a drawer or a toolbox using foam inserts, which are specifically cut for the drawers. This minimizes end-mill movement and damage when in transport.
- Magnetic Holders: Generally used for quickt00 access, magnetic holders can hold end mills either vertically or horizontally. This not only helps save space but also makes finding the end mills easier.
- Plastic Storage Bins: These bins contain sections or partitions that enable end mills to be arranged in categories according to types or sizes. They are easy to carry and offer some protection against contaminants.
- Tool Cabinets with Roll-out Trays: The best cabinet design is professional, providing ample space and order. The roll-out trays make it easy to remove different kinds of end mills, including Forstner bits while keeping them away from access.
These tool organizational solutions can be individually or comprehensively employed in a machine shop to improve tool management and end-mill efficiency.
Using drawer and tray Systems
Drawer and tray systems, commonly encountered in machining processes, are very important to improve production workflow. They enable organized storage of end mills and other cutting tools while promoting convenience. It is possible to include dividers in drawer systems or bulkhead partitions in trays where tools can be mainly segregated by size type to minimize damage and make identification easy. Tray systems, especially those with customized trays, can also be shaped to the specific size of the tool to be stored to keep the tool in place and not allow for other movement that is deemed unnecessary. Besides, a labeling system can assist in accelerating the rate at which tools can be located within the enclosure where they’ve been stored. Employing drawer and tray systems allows the facilities to cut down waste operations and enhance the efficiency and durability of tools.
DIY Endmill Storage Projects
This article offers several ways to store end mills; few of them are enjoyable and do not require special means. Explanation of the below ideas is based on best practices currently observed on the leading websites:
- Magnetic Tool Holders: Clamping a magnetic strip provides a convenient and space-saving storage solution for end mills and taps. Such strips can also be placed on walls or work tables with tools and equipment mounted on them, allowing for easy access and keeping them safe from dirt.
- PVC Pipe Storage: Developing a storage system using would-be-e waste PVC pipes is cost-effective and practical. For instance, it is possible to cut pipes into hooks and fix them upright, thus making a new rack for all end mills, providing efficient space usage and fast searching of items.
- Shadow Boards: A shadow board is not only a decorative addition since it visualizes each tool outline and designates the area where a respective end mill might be kept. This method makes tool identification easier, but most importantly, it enhances the practices and returns in the condition that will allow its next user to utilize it, resulting in increased efficiency of work in the workshop.
Conducting such projects not only encourages orderly work but also facilitates faster undertaking of specific tasks without losing tools in good working condition.
What are the Best tool storage Solutions for end mills?

Choosing the Right cabinet or drawer System
The task of identifying the appropriate cabinet or drawer system for end mill storage involves more than just size, type, material, and efficiency. The following insights are taken from the current top resources regarding this area:
- Size and Configuration: It is very important to determine how many and what sizes of end mills are to be stored so that a system such as a cabinet or a drawer can beproposed. It is important that both the length and the diameter of the tools in the storage help the system to accommodate future tills or tools that will be added to the collection. Any modular system, for example, which allows the changing of the layout to accommodate more storage as demand increases, can be quite useful.
- Material Selection: Hard-wearing materials such as steel tough or tough plastics are durable. One of the most important benefits of these tools is that steel cabinets can be used to store and address these issues, even in the most heavy working loads where additional levels of security for expensive tooling are required. The lightweight types of plastics might be good in smaller carts where factors of handling of plastic products outweigh the need to anchor them with heavy cabinets.
- Accessibility and Organization Features: Consider systems that allow for the inclusion of organizational elements such as trays for the many different sizes of end mill. Tools that are stored in such systems, which have roll out trays or slide out period shelving systems provide ease of access to the tools, so they can be taken out of the tool closet or holder in a hurry.
Efficient storage solutions, that are carefully thought out and implemented, not only maximize available space but improve overall productivity as well and increase the life span of end mills, fostering further tool management good practices.
Benefits of tool storage organizers
Introducing tool storage organizers into the process of tool management has much to offer in terms of tool management efficiency and productivity improvement. The major advantages include:
- Improved Orderliness: With tool storage organizers, tools can be categorized, thus leading to less time searching for any particular tool. This organization decreases the probability of loosing the tools and guarantees that one can find the tools when needed.
- Cleaning of the Work Space: Due to the available vertical and horizontal space, the organizers provide orderliness in the working area. Their shape also enables efficient utilization of small shop space, this is however beneficial in small shops.
- Increased Protection: Well designed storage helps to remove the complication of using numerous surfaces and thus it is easier to prevent accidents. Having tools in a position where they remain motionless and secured diminishes the chances of injuries emanating from misplaced or improperly ranged tools.
- Improved Life Span of the Tools: Organizers ensure that the tools do not get damaged by being subjected to extreme conditions or to any tools that may be said to be destructive. This protection is essential in ensuring that tool performance remains at optimum levels over the years.
- Adjustment of the Tool Storage Design: Most tool storage organizers come in the modular form meant for a given type of tool, for example end mills storage or saw blades storage, which means an individual can get enough space for tools as per his or her requirements with time.
To conclude, adopting a well-organized tools storage system not only enhances the performance of people at work, providing a greater degree of safety in the work area and increasing the lifespan of considerable hardware.
Toolbox Organization Tips
In order to manage the tools in the toolbox effectively and maximize their productivity of the tools, the following methods that have been obtained from the most credible sources are suggested:
- Sorting: Create groups of categorization and usability of tools—there should be separate sections for hand tools, power tools and special tools. This ease in locating the appropriate tool for the task at hand.
- Marking: The location of any material in a toolbox can be easily known by marking the compartments where such items are stored. Thus, toilers waste no time trying to find certain tools, and the area is kept neat.
- Tooling procedures such as end mills and saws tool maintenance are necessary for improving productivity: Have a program where changes and forward-looking thinking are encouraged in your toolbox. From time to time, discard unsuitable tools where places have been made for things around. Moving forward with a toolbox that is in good order helps worker productivity.
By implementing these recommendations, you will achieve the organization of the box with tools, which will facilitate your actions and help preserve the structure and supply of the tools for longer.
How do you organize your end mill Sets Efficiently?
Using dividers and compartments
The planning and arrangements of end mill sets can be further improved by incorporating dividers and compartments efficiently and organized. This enables this setting to be self-arranged without the fear of damaging the tools or having them out of reach. Some of the important tips from other industry experts are:
- Custom Divider Systems: Look for dividers that are within your area of operation and customize them to the appropriate sizes and shapes of the end mills. Adjustable dividers fit different lengths and diameters of the tools and they are always placed into secure and stable compartments.
- Material Selection: Choose high-quality materials such as foam inserts or hard plastic for die-cut dividers so that the end mills do not chip or dull. The foam may also help in color identification systems for partitions or interconnected shapes for different end mill types.
- Modular Storage Solutions: If you are in the process of building your tool storage and organization, consider modular storage systems that allow you to grow and alter the configuration as your collection of tools continues to expand. Such systems are typically provided with compartments of different sizes for maximum organization purposes.
By adopting the above practices, your end mill sets will be organized so that they are easily retrieved and in the best possible condition.
Optimizing toolbox storage Area
In order to efficiently structure your toolbox storage area it is important to apply the best practices described in the leading trade websites. The current best practices can be summarized in the following handy tips:
- Organization by Type: The first step is to classify all the tools into different categories and usage levels. This helps speed up the retrieval process and instill order in the operations. Tools that are often used should be stored within reach, and those used rarely should be put in the farthest storage areas.
- Maximazing Vertical Waste: Make use of the vertical space with help of wall racks, pegboards, and shelves, to hold items such as end milIs and taps. This helps to optimize the working area and also keeps tools in sight and at the same time well arranged. Adjustable hooks and bins help in storing different kinds of tools.
- Labels and numbers: It is advisable to arrange labels in a sensible manner to enable easy location of each and every tool on the toolbox. Further, you might find it helpful to keep a list of your tools and their status while they are in a stage. This will enable you to find out infrangible items quickly and to repair or replace them in time.
Implementing these strategies will significantly improve your toolbox storage efficiency and, in so doing, improve the working environment.
Labeling storage boxes and bins
The efficient available storage boxes and bins should be strategically labeled as this will also help in retrieval and keeping things in order. To begin with, each box or bin should be given a label that can be read without effort and that briefly states what is in that box or bin. Each tool should be assigned the same title or at least the same type of tool names to minimize confusion. For example, you can use different colors of labels to represent various categories of items. Labels located only perpendicular to the upward view or outside front and on the sides of these containers, where applicable, are placed to limit the frontal view. Keep changing the labels when the contents inside change to keep the order and make it easy to find what is required. Following these steps will help enhance the storage process, and ultimately, the productivity level will improve.
What are the Top DIY storage solution Ideas for end mills?

Making drilled holes in Storage Trays
Drilled-hole storage trays have been a practical approach to organizing end mills and other similar utensils, making sure they are properly placed and […].
Here is a summary of the state of the art, according to the three most accessible resources at the moment:
- Material Selection: Wood or HDPE is commonly emphasized as easy to clean and quite enduring. Plywood readily drills through, while HDPE is resistant to chemicals.
- Design Specifications: Provide trays with several uniformly spaced drilled holes for different-sized end mills, where each spouse is not less than a nominal size. A good rule of thumb is to place holes so that the distance between them is about 1 inch apart to make inserting and removing tools during use easier. The hole diameter should equal the shank diameter of end mills so that they do not wobble loosely in their holes.
- Layering and Stackability: Stacking trays within each other could be an option to consider to further enhance orderliness. This method optimizes the available space, and order is maintained on the tools, which is very important, especially for people who become obsessive-compulsive about order. In addition, rounded handles were suggested to ease the movement of trays from one workstation to the other.
Following these guidelines will result in efficient storage of end mills and improve workshop work procedures.
Creating grid Layouts for shank Sizes
Grid layouts in the design allow the categorization of end mills based on shank sizes, aiding in speedy retrieval and use. The following represents a concise summary on available information from particular eminent researchers on the subject:
- Grid Specification. Create a grid that consists of rows and columns that correspond to the different end mill shank sizes in your inventory. While restructuring the system, it would be more efficient to regroup them by batches, for example, shank sizes of 1/8 inch, 1/4 inch, and 3/8 inch.
- Material and Construction: When designing the grid structure, use rigid materials such as MDF or acrylic. These often provide the required sturdiness essential for frequent operations. Think about designing stricter inserts that will be movable depending on specific shank diameter requirements.
- Maximizing Visibility: The grid must be designed in an open-top style to facilitate the viewing of the tools. The grid and tools must be different colours to enhance fast identification of the tools. Each section of the grid can also be labeled, indicating the corresponding shank size with the tool in that section, as this will speed up the process of selecting the tools.
Employing these techniques, you will create a grid layout for various tools’ shank sizes and effectively organize the end mills, enhancing productivity by reducing search time during operations.
Using tubes and inserts for Easy Access
Incorporating tubes and inserts in your workshop can make the dedication and provision of storage for end mills more efficient. Here is a brief summary collected from the comments of the most authoritative sources: Tubular Storage Solutions: Clear storage tubes can be employed to provide individual end mills in an orderly and space-saving manner. These tubes protect the cutting edges and make the tools visible, enhancing swift tool collection. While using tubes, you may also choose various cup sizes to place all the end mills you have.
- Insert Systems for Customization: Insert systems can conveniently organize individual end mills within a fixed storage system. Inserts for specific shank sizes or tool types allow such storage adaption to the changing and growing inventory to be more interesting without the need for room on the shelf. This helps to ensure that the available space is efficiently utilized and all the tools are kept safe and within reach.
- Labeling and Identification: Furthermore, it is important to be able to attach a labeling system both on tubes and inserts to utilize the essential features effectively. Any internal containers must have clear labels indicating the size or type of the end mill included, which minimizes time wastage while searching for the tools and avoids mix-ups upon use, which I trust you have not suffered from the wrong use or miscellaneous storage of the tools. One more method of helping in identification is sticking proper labels on the infrequent tools.
Incorporating tubes and inserts into your organization strategy enables you to increase the number of tools available while still ensuring the orderliness and safety of the working environment.
How to Maintain Your End Mill Storage Organizers?

Regular Cleaning and Maintenance Tips
In order to avoid issues with the efficiency and longevity of the end mill storage organizers, cleaning and maintenance procedures should be performed on a regular basis. Here are some quick guidelines based on industry best practices:
- Periodic Checks: Visually examine the storage tubes in which inserts are kept for any deterioration and damage on a regular basis. Make sure that the protective components of the tools housed therein remain intact.
- Dust and Debris Clearing: Soft brushes and other cleaning implements are ineffective for eliminating dust and debris buildup from storage units; instead, compressed air is used. End mill contamination is controlled, so the tools stay clean and in working order.
- Correct Cleaning Agents: It is advised to use a mild detergent solution and a soft cloth on the storage organizers only when it is needed. Harsh cleaners are prohibited especially using on the tubes and inserts for endmills of quality.
- Proper Orientation: Organizer placement must be done in an area that is normally dry and within average room temperature to avoid wetness and rust on the cutting edges
- Maintenance Checks: Consistently review the label maintenance policy to avoid alterations in label comprehensibility and maintain the correct specifications of the tools. Such appreciations assist in prompt locating and enhancing safety measures.
Adopting such maintenance practices can protect your end mill storage solutions from wear and tear, making them last longer while keeping your working area neat and orderly.
Ensuring clearance in drawer Systems
In drawer systems’ operating characteristics, their installation must make allowance for sufficient clearance. To avoid mishaps, the following guidelines should be adhered to:
- Measure Dimensions: Before the installation process, the actual measurements of the drawers and or their surrounding space must be gauged accurately. This includes thinking not only about the height and width but even about depth to avoid any form of blockage when in use.
- Make Consideration for Expansion: Temperature changes often lead to material expansion or contraction. There is usually a rule that one should leave quite a normal addition of clearance, one eighth of the inch, to prevent the drawers from rubbing against each other when they are operable.
- Check Track Alignment: Drawer tracks must also be checked periodically. Incorrect alignment may limit drawer movement, requiring an adjustment of some sort in the clean space and sometimes clearance.
- Avoid Overloading: Manufacturers’ recommended weight loading should always be observed to avoid drawer systems sagging, affecting the drawers’ space. Enhancing routine checks and weight egress comes in handy.
- Performance Testing: Moveable partitions should be able to perform their intended functions after they have been installed. These functions include opening and closing within acceptable levels without any resistance. Any challenges shall be countered at once to ensure maximum safety and efficiency.
By observing these practices, you can maintain drawer systems’ operational efficiency by occupying only the space necessary for their unhindered use.
Protecting shank and cutter Edges
Shank and cutter edges shall be protected and well-maintained throughout storage and use by observing the following provisions:
- Use Protective Covers: When not in use, cover the unclasped shanks and cutters with protective coverings. This is important to discourage the parts from knocking about and friction during movement.
- Maintain Proper Storage: Ensure the cutting tools are exposed to the storage area only, where there will be no more movement or contact with other cutting tools that may cause them to scratch or chip. Toolboxes with soft cushioning inside or custom foam stuffing inner walls are the best here.
- Regular Inspection and Maintenance: Examine the cutting surfaces and edges for damage or cutter wear. Take care of the worn cutters’ sharpening and replace any defective parts that may interfere with the proper functioning of the tool or the surface being worked.
- Avoid contaminants that can affect the performance of your end mills and saws. Do not allow the cutting edges of the shank and cutter to come into direct contact with dust, particulate matter, and chemicals which can wear the surfaces. Tools should be washed and cleaned after every cutting so as not to lose their abilities.
These measures will prolong the lifespan of shank and cutter edges, guaranteeing the efficiency and accuracy of machining operations.
Reference Sources
Frequently Asked Questions (FAQs)

Q: What are good end mill holder ideas that will work well for CNC usage?
A: For a CNC operation, you can utilize a tool chest, Lista cabinets, or specially-made holders constructed from wood or plastic. These options are easy to use and allow you to arrange and safeguard the end mills.
Q: How can I arrange end mills and cutter bits together?
A: To store and keep end mills and cutter bits, you can opt for a tool chest with Indonesian drawers or a specially designed holder with separate slots for each tool type. This way, they will be easy to access and safe from misuse.
Q: Which storage option is suitable for Onefinity CNC?
A: For the Infinity CNC machine, a small locker, tool chest, or wall unit that can be securely put near the machine for the best end mills will suffice. This ensures that tools are always available and there is not too much clutter in the work area.
Q: What can CNC machine users do to stop the rusting of end mills while in storage?
A: To curtail rust, end mills need to be stored in a dry place. It could also be important to include some rust preventatives or desiccant bags in the storage item. Having the tool in a portable plastic case also advocates the inhibition of evaporation.
Q: Do any community forums, such as the Carbide 3D community, share any suggestions related to the storage of end mills?
A: Plenty, as the Carbide 3D community site quite frequently shares practical storage solutions such as based towards taps and end mills, a small cardboard box, or 3D print holders from Thingiverse.
Q: What’s a budget-friendly way to store high-caliber end mills?
A: A more professional and inexpensive way to approach the problem is to construct DIY holders from scrap wood or buy the tool as mentioned above carts cheaply from Harbor Freight. Custom-cut slots will safely hold end mills of different diameters.
Q: How should I store end mills to avoid any issues with retrieval?
A: For easy retrieval, organize end mills by size and type and assign and label different slots or drawers for each category. You can also keep them near your CNC or router machine, making the overall process faster.
Q: What are the benefits of using a Lista cabinet for end mill storage?
A: The Lista cabinets are sturdy and sturdily built with different drawers that can be fitted with dividers. This enables the end mill, face mill, and other tools that use up space to be much wiser with storage, keeping any tool damages and losses to a minimum.
Q: Can I use a 2×6 wood block for end mill storage?
A: If one were to make holes in a 2×6 wood block for end mills, it is an effective and very straightforward technique for storing and organizing end mills. It is an affordable way to ensure that tools are easily located and stored efficiently.
Q: What’s an ideal storage method for small amounts of end mills?
A: A small plastic container is also sufficient for a small collection, or the bottom drawer of a tool chest. This keeps the tools nicely organized and safe without occupying too much space.


